When to Activate an eSIM: The Right Timing for Travel
Install your eSIM at home, activate it after you land. That’s the rule for the vast majority of travel eSIM plans, and it’s the single decision that keeps you from burning paid data days before your trip even starts.
- Install before departure, on your home Wi-Fi, so the profile is ready to go.
- Activate on arrival, once your phone connects to a network at your destination, which is what starts most plans’ validity clocks.
- Exception: some plans start counting the moment you buy them, not when you first connect. Always check the fine print before you assume otherwise.
Apple’s own eSIM setup documentation outlines several ways to get a profile onto your phone, and most travel eSIM providers build their instructions around the same install-then-activate logic.
Key Takeaways
Installing an eSIM before travel and activating it after landing prevents wasted plan days while keeping setup fast and reliable.
| Point | Details |
|---|---|
| Install at home | Download the profile on stable Wi-Fi days or weeks before departure. |
| Activate on arrival | Wait until you’re in destination network range to trigger the plan’s validity. |
| Check the policy first | Confirm whether validity starts on purchase, first connection, or a set date before buying. |
| Match timing to trip type | Short trips need precise activation timing; long stays and cruises allow more flexibility. |
| Lumo simplifies the process | Its plans state activation timing clearly upfront and support fast QR reissue if setup fails. |
Where to verify eSIM setup details
- Apple’s eSIM setup guide covers device-level install and activation methods for iPhone.
- Apple’s regional support page flags carrier and device compatibility quirks by market.
- Sim Travel Guide’s activation walkthrough explains install-versus-activate timing in plain terms.
- Truescho’s pre-travel activation guide breaks down the install-before, activate-on-landing rule.
Always check your specific provider’s product page and terms before buying since policies vary.
Table of Contents
- When Should I Activate My eSIM Before or After Travel?
- Should You Install Your eSIM Before or During Travel?
- What’s the Best Time to Activate an eSIM for Your Trip?
- How Do Providers Handle eSIM Activation and Validity?
- How Do You Install and Activate an eSIM Step by Step?
- What Do You Do If eSIM Activation Fails?
- A Lower-Risk Way to Handle eSIM Activation
- Sources
- FAQ
When Should I Activate My eSIM Before or After Travel?
Installing and activating are two separate events, and mixing them up is the number one reason travelers waste money on eSIM plans. Installation is just downloading the profile: a small file that tells your phone which network to talk to. Activation is different. It’s the moment your phone actually connects to a live tower and the provider starts the clock on your plan’s validity.
You can install a profile the day you buy it, whether that’s three weeks or three hours before your flight. Activation typically can’t happen until you’re within range of the network the plan is built for, since your phone needs a physical connection to trigger it. Installing requires a stable Wi-Fi connection, a compatible unlocked device, and (on some phones) your device’s EID number handy. Activation requires being physically present where the network operates.
Mixing these up costs real days. If your plan’s validity starts at first connection and you accidentally connect while still at home on a layover with roaming enabled, you might trigger activation early without meaning to.
- Install: needs Wi-Fi, an unlocked device, sometimes an EID.
- Activate: needs to happen inside the destination’s coverage zone.
Pro Tip: Label your eSIM line something obvious like “Travel Japan” the moment you install it, and leave data roaming switched off for that line until you land. It stops your phone from guessing which network to use and prevents accidental early activation.
Should You Install Your eSIM Before or During Travel?
Both approaches work, but they suit different travelers. Installing before you leave means you’re setting things up on reliable home internet instead of fumbling with the shaky Wi-Fi at Heathrow or Narita. It also means you land, flip a switch, and you’re online, which matters if you need a map, a rideshare app, or a hotel confirmation the second you clear customs.

The downside only bites if you install and activate too early relative to a short trip. A five-day plan that starts counting the moment you first connect, connected accidentally on your layover, effectively becomes a four-day plan.
Buying and activating while already traveling has its own logic. You control the exact moment your plan starts, which matters if your itinerary shifts. Some regional pricing is also easier to shop while you’re actually there, since local promotions or shorter validity windows sometimes only show up once you’re in-market.
- Install-before-travel wins for: short trips, first-time eSIM users, anyone who wants zero setup stress at the airport.
- Buy-while-traveling wins for: open-ended trips, travelers chasing flexible or last-minute pricing, people comfortable troubleshooting on the go.
Multi-country trips split the difference. Install before you leave, but hold off on activation until you touch down at your first stop, since most regional plans stay active as you cross borders afterward.
What’s the Best Time to Activate an eSIM for Your Trip?
Trip length and structure change the calculus more than anything else. Here’s how to think about the most common travel patterns.
Short trips (1 to 7 days). Install before you leave, activate the instant you land. Every day your plan is active but unused is a day you paid for and didn’t get, so precision matters most here.
Longer stays (30 days or more). The same install-before, activate-on-arrival rule applies, but you have more slack. A month-long plan can absorb a few hours of delay between landing and activating without meaningfully denting your value.
Multi-country regional plans. Activate once you reach your first destination, then leave the eSIM active as you cross into neighboring countries covered by the same plan. Reactivating at every border adds friction for no benefit.
Cruises and low-connectivity trips. Activate at your first port of call rather than before you leave the dock. Days spent entirely at sea typically use no cellular data anyway, so there’s nothing to gain by activating earlier.
Last-minute or uncertain travel dates. If you’re not sure exactly when you’ll land, or your plans keep shifting, either:
- Buy and activate on arrival instead of pre-installing days out.
- Choose a plan explicitly built for flexible or on-demand activation.
That second option matters more than people realize. Some providers structure validity to start on purchase no matter when you actually use the data, which is fine for planned trips but a bad fit if your schedule is still moving.
How Do Providers Handle eSIM Activation and Validity?
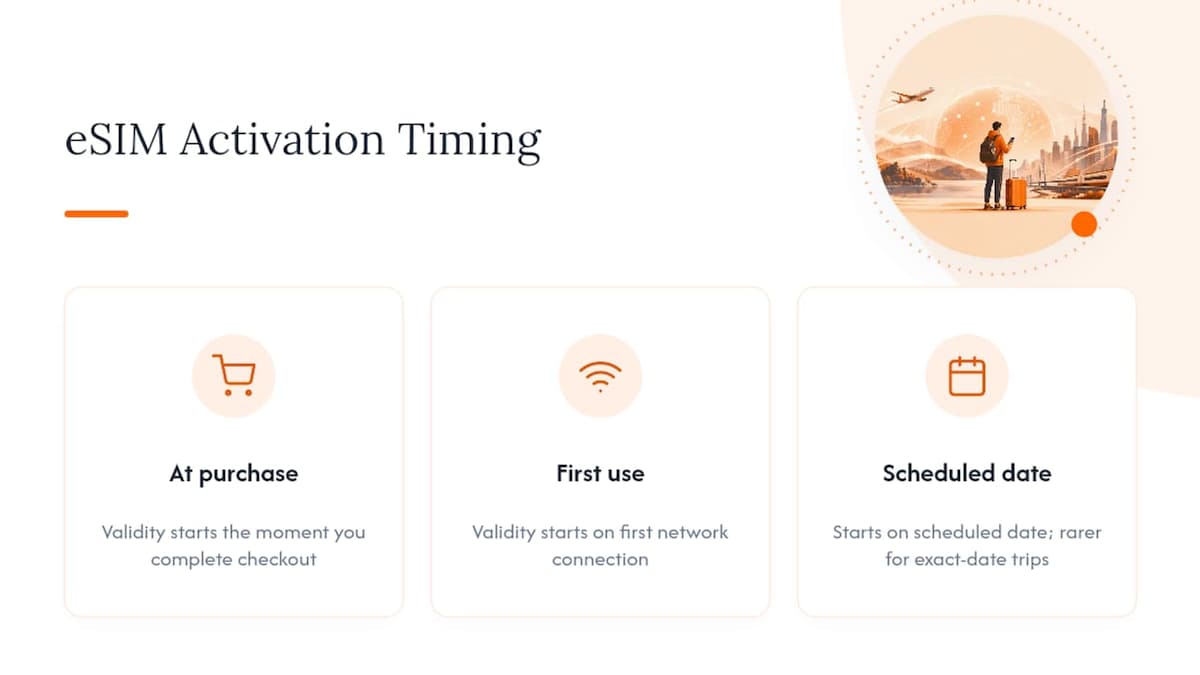
Not every eSIM behaves the same way once you buy it, and the differences show up in three basic patterns: validity that starts the moment you complete checkout, validity that starts on first network connection, or validity that starts on a specific scheduled date you choose. That last option is rarer but shows up on plans built for exact-date trips.
You can usually confirm which model you’re dealing with by checking the product listing itself, the plan’s terms and conditions, the confirmation email that arrives with your QR code, or the provider’s FAQ page. If none of that spells it out clearly, that’s a red flag worth pausing on before you buy. Industry blogs covering this exact question, like Cherry eSIM’s activation timing guide, note the same caveat repeatedly: assume nothing, read the terms.
Compatibility adds another layer. iOS and Android handle eSIM installation slightly differently, and Apple’s regional support documentation flags device- and carrier-specific quirks that vary by market. Older OS versions or carrier-locked phones can block installation entirely, so check your device’s compatibility before you buy, not after.
Pro Tip: Save three things the moment you get them: your EID number, the confirmation email with your QR code, and your order ID. If activation fails, support can usually fix it in minutes with those three details instead of the twenty it takes without them.
How Do You Install and Activate an eSIM Step by Step?
Most activation methods fall into four categories, and knowing which one your provider uses saves you from guessing at the airport.
QR code (the most common method). On iPhone, go to Settings, then Cellular, then Add eSIM, and scan the code. On Android, it’s usually under SIM manager or Network settings. Label the line clearly, set your data preference, and leave roaming off until you’re at your destination. Lumo’s QR code activation walkthrough covers the exact taps for current iOS and Android versions.
Carrier app or activation link. Download the provider’s app, follow the in-app prompts, and confirm the profile shows as installed in your device settings afterward.
Carrier-assigned during device setup. Some carriers push an eSIM automatically when you first set up a new phone. Apple’s support documentation confirms this happens during initial setup for certain carrier partnerships, so check before manually adding a second profile.
Manual entry or transfer. Use manual ICCID or EID entry when a QR code won’t scan, and use transfer tools when moving a profile from an old device to a new one.
Before you board your flight, confirm four things:
- The line is labeled clearly.
- Default voice and data settings point to the right line.
- Data roaming is enabled only for the travel eSIM, not your home line.
- The profile shows as “installed” (not yet active) in your cellular settings.
Setup itself usually takes only a few minutes once you’re on a stable connection at home.
What Do You Do If eSIM Activation Fails?
Run through this list before your trip:
- Confirm your device is unlocked and carrier-free.
- Check your OS is updated to a version that supports eSIM.
- Install the profile on Wi-Fi, never on spotty cellular data.
- Save the confirmation email with your QR code somewhere offline.
- Label your lines and set roaming only on the travel eSIM.
- Record your EID and order ID in your notes app.
If you land and see “No Service,” the fix is usually simple:
- Toggle Airplane Mode off and back on.
- Manually select the travel eSIM line for data in your cellular settings.
- Restart the phone.
- Delete and reinstall the profile if the problem persists.
- Contact support with your saved EID, QR email, and order ID ready.
The most common cause of “No Service” isn’t a broken eSIM. It’s roaming turned off for the travel line while your home line’s roaming setting is still active, confusing which network your phone tries to use.
Pro Tip: If the plan won’t connect at all, don’t panic and buy a second one. Most providers can reissue your QR code and reinstall the profile within minutes using the original confirmation email.
An editor’s take on getting this right
After watching travelers make the same mistake over and over, the pattern is always the same: they activate too early out of anxiety, not necessity. Install before you leave, activate on arrival, and check the provider’s validity policy before checkout. Lumo builds its plans around exactly that workflow.
A Lower-Risk Way to Handle eSIM Activation
Lumo removes the guesswork from timing because activation happens the instant you’re ready for it, not on some ambiguous schedule buried in fine print. Coverage spans 160+ countries, plan durations flex to match your actual trip length, and the QR code goes live the moment you scan it.
- Clear activation policy, stated upfront, so you know exactly when your plan’s clock starts before you buy.
- 24/7 support and fast QR reissue if a profile fails to connect, so a bad first attempt doesn’t cost you a day of your trip.
If you’re planning a trip and want one less thing to worry about at the gate, check Lumo’s eSIM plans and pick a duration that matches your itinerary before you fly.
Sources
- Set up eSIM on iPhone - Apple Support
- How to Activate eSIM: iPhone & Android (2026) — Sim Travel Guide
- How to Activate eSIM Before Travel (Truescho blog)
- Set up eSIM (regional Apple support page)
FAQ
Do you activate an eSIM before or after you arrive?
Install the profile before you travel, but wait to activate until you land, unless your plan explicitly states validity starts at purchase.
Do I need to turn off my primary line when using an eSIM?
Not necessarily. Most phones support dual-SIM operation, so you can keep your home line for calls and texts while your eSIM handles data, as long as you disable roaming on the home line to avoid charges.
Should I turn off data roaming when using an eSIM?
Turn off roaming for your home SIM, but leave it on specifically for your travel eSIM line, since that’s what lets it connect to local partner networks abroad.
Is an eSIM activated immediately after purchase?
Not usually. Most travel eSIMs, including Lumo’s, activate when the profile first connects to a network at your destination, though some providers do start validity at the moment of purchase, so check the terms first.
What if I’m crossing time zones between installing and activating?
Time zones don’t affect installation, but they matter for validity countdowns. A plan that starts on first connection begins counting in your destination’s local time, not your home time zone.
Recommended
Related Topics
Stay Connected Anywhere
Prepaid eSIM data plans for 180+ countries and territories. No physical SIM required.