Fix eSIM Activation Problems: Steps for iPhone & Android
Most eSIM activation failures come down to three things: a carrier-locked device, a QR code that’s already been used, or no working internet during install. Before anything else, open Settings and check Carrier Lock status, confirm you’re on real Wi‑Fi (not a hotel captive portal), and verify you haven’t already scanned that QR code once.
Try these three things first, in order:
- Toggle Airplane Mode on for 10 seconds, then off.
- Restart the device completely (not just the cellular toggle).
- Turn the cellular line off, then back on, in Settings.
If none of that works within a short time, the problem is likely device- or account-level, and the steps below will get you there.
Key Takeaways
Most eSIM activation problems trace back to a locked device, a single-use QR code that’s already been consumed, or a missing internet connection during install.
| Point | Details |
|---|---|
| Check Carrier Lock first | Settings > General > About must show “No SIM restrictions” before a travel eSIM will activate. |
| Never rescan a used QR code | Request a reissue or manual SM-DP+ details instead of repeatedly scanning the same code. |
| Give provisioning time | Wait 15 to 30 minutes before escalating; restarting mid-handshake can reset the process. |
| Gather IMEI and EID early | Support resolves tickets faster when you provide both identifiers and exact error text upfront. |
| Choose a provider with clear reissue policies | Lumo offers instant QR activation and 24/7 support to resolve stuck profiles quickly. |
Where to Go for Official Help
- Apple’s eSIM setup guide for iPhone-specific diagnostic steps
- AT&T’s eSIM troubleshooting FAQ for carrier-side recovery options
Save screenshots and your IMEI/EID before opening a support ticket with any of the above.
Table of Contents
- What You Need Before You Try Esim Activation Again
- How Do You Troubleshoot eSIM Activation Step by Step?
- Is Your Device or Carrier Account Blocking Activation?
- Why Does My eSIM Show an Error Message?
- Should You Reset Network Settings or Delete an eSIM Profile?
- What Should You Tell Your Carrier When You Contact Support?
- How Can You Avoid eSIM Setup Problems Next Time?
- A Reliable eSIM Plan Removes Most of This Risk Upfront
- Sources
- FAQ
What You Need Before You Try Esim Activation Again
Half of failed activations trace back to something that was wrong before the QR code was ever scanned. Confirm these four things first:
- Device compatibility. Check that your exact model supports eSIM and that Settings shows an “Add eSIM” or “Add Cellular Plan” option at all.
- Software version. Update to the latest iOS or Android build your device supports, plus any pending carrier settings update.
- Account status. Carrier Lock should read “No SIM restrictions,” and there should be no SIM-protection lock active on the account.
- Connection quality. Use stable, unrestricted Wi‑Fi. Captive-portal networks (hotel or airport logins) frequently block the background download that installs the profile.
This four-point check catches most common eSIM setup problems before you burn time on deeper troubleshooting.
How Do You Troubleshoot eSIM Activation Step by Step?
Work through this list in order. Most people jump straight to step 4 or 5, then wonder why nothing’s changed, when the fix was sitting at step 1.
- Toggle Airplane Mode. On, wait 10 seconds, off. This forces the device to re-register with the network and clears minor handshake glitches.
- Restart the device. A full restart, not a soft reset, clears cached network states that toggling alone won’t touch.
- Turn the cellular line off and back on. In Settings, disable the specific eSIM line, wait a moment, then re-enable it.
- Re-scan the QR code, but only if the profile never installed at all. If you already see a profile listed under Cellular Plans, do not rescan. Most travel eSIM QR codes are single-use tokens, and a second scan often triggers an “invalid code” error instead of a fresh install.
- Check your network, not just your bars. Open a browser and load a page. If it won’t load, or you’re on a captive-portal network, switch to a phone hotspot from another device and try again.
- Give it time. Apple’s own guidance confirms that a working internet connection, updated software, and a full restart are the core steps before contacting your carrier, and provisioning genuinely can take a few minutes to complete on the carrier’s end.
Pro Tip: Resist the urge to keep toggling settings every 30 seconds while a profile is provisioning. Carrier handshakes take a moment to complete, and restarting mid-handshake often forces the process to reset from zero, adding to your wait instead of shortening it.
If you’ve worked through all six steps and still have no signal, the issue has likely moved from “software glitch” to “account or device lock,” which needs a different fix entirely.
Is Your Device or Carrier Account Blocking Activation?
Carrier locks are the single most common reason a technically compatible phone still refuses a new eSIM. Check this before anything else:
- On iPhone: go to Settings > General > About, then scroll to Carrier Lock. It needs to read “No SIM restrictions.” Anything else means the device is locked to a specific carrier, and third-party eSIMs will keep failing until that’s resolved.
- On Android: the equivalent sits under Settings > About Phone > Status, or you can dial
*#06#to pull device details and check with your carrier directly, since the exact menu path varies by brand. - IMEI vs. EID: your IMEI identifies the physical device; your EID identifies the eSIM chip itself. For more unlock options and third-party diagnostic tools related to IMEI, see The Best Iunlocker.com Alternatives For IMEI Checks. Carriers and support teams ask for both because a locked IMEI and a blocked EID are two different problems with two different fixes.
- SIM protection locks. Some carrier accounts have an added security lock (sometimes shown as “SIM Protection”) that blocks any new profile, physical or digital, until you disable it in your account settings or app.
If the device turns out to be locked, only the carrier can remove that restriction, and the FCC’s consumer guide lays out what to expect: unlocking is carrier-controlled, and it can take anywhere from minutes to several days depending on your account’s payment status and contract terms.
Why Does My eSIM Show an Error Message?
Not every failure looks like a blank screen. Carriers throw specific error codes, and each one points to a different fix.
- “Invalid QR code” or “Unable to add cellular plan”: almost always a QR code that’s already been consumed, or one scanned incorrectly. Request a fresh code or ask your provider for the manual SM-DP+ address and activation code instead of rescanning.
- Error 519 or “SIM Protection” messages: this is an account-level block, not a device problem. Some carriers document this exact scenario and require you to disable the protection setting in your account before the profile will install.
- Profile installs but shows “not activated”: this is a provisioning delay on the carrier’s side, not a failed install. Give it 15 to 30 minutes before escalating.
Manual entry (typing the SM-DP+ address and activation code by hand) is worth trying whenever the QR code activation keeps failing, since it bypasses camera and scanning issues entirely.
Pro Tip: If you’re scanning a QR code from a second device or a screenshot, bump the screen brightness to maximum and make sure there’s no glare. A dim or reflective screen is a surprisingly common reason scans fail on the first two or three tries.
Should You Reset Network Settings or Delete an eSIM Profile?
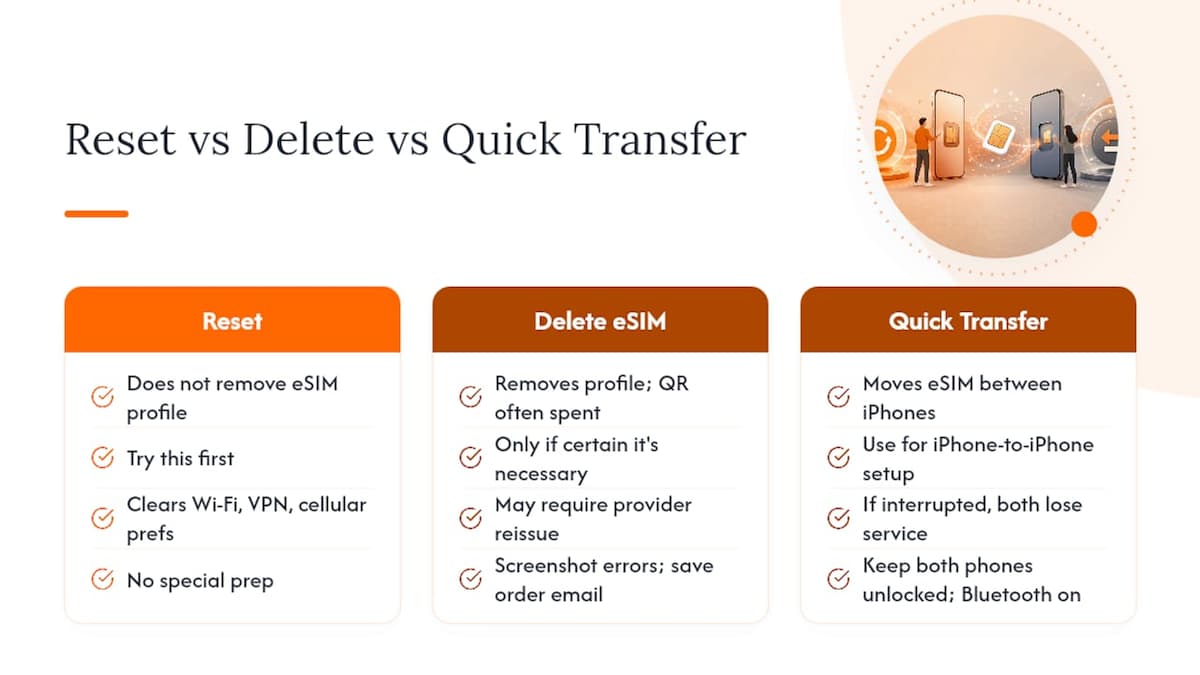
Resetting network settings clears saved Wi‑Fi passwords, VPN configs, and cellular preferences, but it does not remove your eSIM profile. Try this before anything more drastic. A full device reset is a last resort and should come only after you’ve confirmed nothing else works.
Deleting an eSIM profile is a different story. Many providers treat that QR code as spent the moment it’s installed once, so deleting it can mean your only path back is asking the provider to reissue.
Before you delete anything, screenshot your error messages and pull up your order confirmation email. If you need a reissue, having the order number ready turns a multi-day support ticket into a same-day fix.
Quick Transfer between iPhones has its own risk: if the transfer is interrupted, both the old and new device can end up without service temporarily. Keep both phones nearby, unlocked, with Bluetooth on, until the transfer fully completes.
What Should You Tell Your Carrier When You Contact Support?
Before you open a chat or make a call, gather your order number, screenshots of the exact error text, your phone model and OS version, and your IMEI and EID.
A short script works well: “My eSIM won’t activate. I’ve restarted, checked Carrier Lock, and confirmed Wi‑Fi is working. Here’s my error message and IMEI/EID. Can you confirm the profile’s provisioning status or re-push it?” Carrier support pages, including AT&T’s eSIM troubleshooting FAQ, outline exactly this kind of account-side recovery for stuck or deleted profiles. If the problem is clearly server-side, ask directly whether they can re-push the profile or reissue the QR code rather than repeating steps you’ve already tried.
How Can You Avoid eSIM Setup Problems Next Time?
Install new eSIMs on stable home Wi‑Fi before you travel, not at the airport gate. Some travel eSIMs are designed to activate only on arrival, so check that policy before assuming something’s broken.
- Keep your old SIM active for verification codes until the new plan is confirmed working.
- Save the original order email and activation code somewhere you can find it offline.
- Buy from providers with clear reissue and transfer policies, and confirm your device shows “No SIM restrictions” well before departure, not the morning of your flight.
Pro Tip: Treat your eSIM activation email like a boarding pass. Screenshot it, save it offline, and keep it accessible even without signal.
A note on where people actually waste time
The biggest time sink isn’t a broken phone, it’s rescanning a consumed QR code five times or restarting mid-provisioning and resetting the clock. Give a stuck activation 15 to 30 minutes before you touch anything else.
A Reliable eSIM Plan Removes Most of This Risk Upfront
Every fix above exists because something upstream went wrong: a locked device, a spent QR code, a provider with no clear reissue path. Lumo is built around removing those failure points before they happen. Activation is instant QR delivery to your inbox the moment you buy, coverage spans 160+ countries so you’re not hunting for a new provider mid-trip, and support runs 24/7 if a profile does need reissuing.
- Instant QR code activation, no waiting on provisioning windows
- Coverage across 160+ countries on a single account
- Multiple eSIM profiles across phones, tablets, and laptops
- 24/7 support if you hit a snag with reissue or transfer
If you’re planning your next trip and want one less thing that can go wrong at the gate, check Lumo’s eSIM plans and get your QR code ready before you pack.
Sources
- Unable to Activate eSIM on iPhone? Complete Fix Guide
- If you can’t set up an eSIM on your iPhone
- Apple eSIM troubleshooting (carrier support documentation)
FAQ
Why Is My eSIM Failing to Activate?
The most common causes are a carrier-locked device, a QR code that’s already been used once, or an unstable internet connection during install. Check Carrier Lock status and confirm you’re on working Wi‑Fi before trying anything else.
Why Is My eSIM Stuck on “Activating”?
This usually means the profile downloaded successfully but carrier provisioning hasn’t finished yet, which can take 15 to 30 minutes. Avoid restarting the device during this window, since it can force the handshake to reset.
Why Am I Not Receiving Service After Activating My eSIM?
An installed and even “activated” profile with no actual service points to a data routing issue, such as the wrong preferred data line or an incorrect APN, not a failed installation. Toggle the cellular line off and back on, and confirm the eSIM is set as your active data line.
Can I Reuse a QR Code if My First Activation Attempt Failed?
Usually not. Most travel eSIM QR codes are single-use, so a failed first attempt typically means you need a reissued code or manual SM-DP+ details from your provider rather than a second scan.
How Do I Know if My Phone Is Carrier-Locked?
On iPhone, check Settings > General > About > Carrier Lock, which should read “No SIM restrictions.” On Android, dial *#06# for device details or check directly with your carrier, since the unlock status menu varies by brand.
Recommended
- eSIM Activation Issues: Quick Fixes for iPhone Users | Lumo eSIM Store
- How to Troubleshoot eSIM Connectivity Issues Fast | Lumo eSIM Store
- How to Troubleshoot eSIM Issues for Seamless Connectivity | Lumo eSIM Store
- Step-by-step eSIM activation guide for seamless global connectivity 2026 | Lumo eSIM Store
Related Topics
Stay Connected Anywhere
Prepaid eSIM data plans for 180+ countries and territories. No physical SIM required.