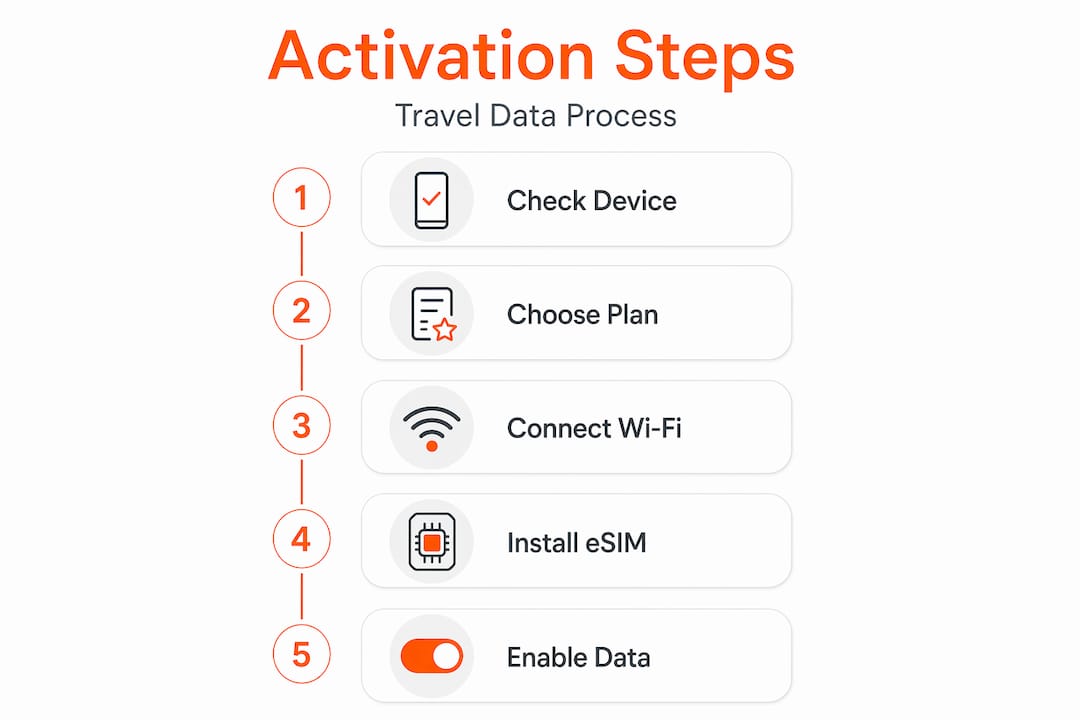
Step by Step Data Activation Process for Travelers

TL;DR:
- Proper preparation, including device compatibility checks and plan selection, is essential to activate international mobile data successfully.
- Always scan your eSIM QR code within your device’s cellular settings and enable data roaming after installation to avoid connectivity issues abroad.
You land in Tokyo, Frankfurt, or São Paulo, open your maps app, and nothing loads. Your phone shows no signal, no bars, and no data. For business travelers and frequent fliers, this isn’t a minor inconvenience. It’s a productivity problem. The step by step data activation process for international mobile plans is something millions of travelers get wrong every year, not because it’s technically hard, but because nobody explains the full sequence clearly. This guide covers everything: what to prepare before you leave, how to activate both traditional roaming and eSIM plans, and how to fix the most common issues the moment something goes wrong.
Table of Contents
- Key takeaways
- Prerequisites for a successful data activation
- Step-by-step activation for roaming and eSIM plans
- Verifying activation and fixing common issues
- Best practices to control costs and data usage
- My honest take on international data activation
- Get connected before your next departure with Lumo
- FAQ
Key takeaways
| Point | Details |
|---|---|
| Prepare before departure | Confirm your device is carrier-unlocked and gather all activation materials before leaving home Wi-Fi. |
| Use eSIM cellular settings | Always scan your eSIM QR code from your phone’s cellular settings menu, never from the camera app. |
| Enable data roaming after install | Activating an eSIM does not automatically turn on data roaming. You must toggle it on manually. |
| Troubleshoot with airplane mode | Toggling airplane mode on and off after landing resolves the majority of “No Service” eSIM issues. |
| Monitor usage to control costs | Disable Wi-Fi Assist and Adaptive Connectivity to prevent automatic background data roaming charges. |
Prerequisites for a successful data activation
Before you touch any activation screen, your preparation determines whether the process takes three minutes or three hours. Skipping this phase is the single biggest reason travelers get stuck at the airport with no connectivity.
Check device compatibility and carrier unlock status. Not all phones support eSIM, and not all unlocked phones are confirmed unlocked. On iPhone, go to Settings > General > About and look for “No SIM restrictions.” On Android, the easiest test is inserting a different carrier’s SIM. Carrier-locked phones will block third-party eSIM profiles entirely, so confirming this before your trip saves a lot of frustration mid-journey.
Choose the right plan type. Your options generally fall into three categories:
- Traditional roaming pass: Your home carrier extends coverage abroad. For example, AT&T’s International Day Pass costs $10 per day for shorter stays or $70 per month for longer trips, with pay-per-use as a pricey fallback.
- Travel eSIM plan: A separate digital SIM profile from a provider like Lumo, purchased and downloaded before your trip, offering local or regional data rates.
- Local SIM card: A physical SIM purchased at your destination, requiring a compatible unlocked device.
Pro Tip: Update your phone’s software before you travel. Older operating systems occasionally have eSIM provisioning bugs that manufacturers patch in routine updates. Back up your device while you’re at it.
Here is a quick reference for what you need before starting the activation workflow:
| Plan type | What you need | Best for |
|---|---|---|
| Carrier roaming pass | Carrier account access, app or SMS | Short trips with existing carrier |
| Travel eSIM | QR code or activation code, stable Wi-Fi | Frequent travelers, cost-conscious users |
| Local SIM | Unlocked device, local ID in some countries | Long stays, heavy data users |
Stable Wi-Fi is non-negotiable for eSIM downloads. Attempting to download an eSIM profile over a weak or spotty connection mid-transit can corrupt the profile and force you to contact support for a replacement code.
Step-by-step activation for roaming and eSIM plans
This is the core of your data activation workflow. The process splits depending on which plan type you chose, but both paths follow a clear sequence.
Activating a traditional roaming plan
- Log into your carrier’s app or website at home before departure.
- Navigate to “International” or “Travel” options and select your destination country.
- Choose your plan (daily, monthly, or pay-per-use) and confirm the purchase.
- If your carrier supports SMS activation, text a keyword like “TRAVEL” to a short code as directed.
- Once confirmed, go to Settings > Cellular (or Mobile Data) > Data Roaming and toggle it on.
- Reboot your phone to apply the new plan settings.
Activating a travel eSIM
The eSIM activation process is faster than most people expect. From scanning the QR code to full connectivity typically takes about three minutes, with the profile download itself completing in 10 to 30 seconds. Here is the exact sequence:
- Purchase your eSIM plan and receive the QR code by email or in-app.
- On iPhone: go to Settings > Cellular > Add eSIM > Use QR Code. On Android (Samsung): Settings > Connections > SIM Manager > Add eSIM. On Google Pixel: Settings > Network & Internet > SIMs > Add eSIM.
- Scan the QR code directly from within the cellular settings screen. Do not use your phone’s camera app. Scanning via camera often fails and can invalidate the QR code permanently since most travel eSIM codes are single-use.
- If scanning fails, use the manual activation code provided by your eSIM provider instead.
- Name the new plan (for example, “Lumo Europe”) to differentiate it from your home SIM.
- When prompted about default lines, set your home number for calls and the travel eSIM for data.
- After installation, go back to your cellular settings and enable Data Roaming specifically for the eSIM line.
Pro Tip: Complete your eSIM installation at home on your regular Wi-Fi before you leave. Most providers’ plan timers start only when you first connect to a network abroad, so installing early costs you nothing and means you’re ready the moment you land.
For dual SIM devices, confirm that the eSIM is set as the default data line. This step gets skipped surprisingly often, and the result is that your phone keeps routing data through your home SIM, triggering roaming charges from your primary carrier.

Verifying activation and fixing common issues
Once you’ve completed the activation, a quick check confirms everything is working before you need it in an unfamiliar city.
Open a browser and load a page that isn’t cached. Check your carrier settings by going to Settings > Cellular to confirm the eSIM line shows “Connected” or your local carrier’s name. If you see “No Service” after landing, toggling airplane mode on and off then re-enabling data roaming resolves the problem the vast majority of the time.
Here are the most common issues and their fixes:
- No Service after landing: Toggle airplane mode off and on. Then verify data roaming is enabled on the correct SIM line.
- QR code won’t scan: Enter the activation code manually. Check that your screen brightness is high and that you’re scanning from within cellular settings, not the camera app. Read more about QR code activation for a full breakdown.
- Data not working despite active plan: Check that the eSIM line is set as the default for cellular data, not your home SIM.
- APN errors: Some regional carriers require manual APN configuration. Your eSIM provider should supply these settings. Enter them under Settings > Cellular > Cellular Data Network.
- Carrier not activating account-side: Log into your carrier portal or call support to confirm the plan is active and tied to your device’s IMEI.
Pro Tip: If you’re troubleshooting a dual SIM setup, put your home SIM into “Data Pause” or disable it temporarily. This forces your device to route everything through the travel eSIM and eliminates the most common source of confusion.
Persistent issues after all of this almost always mean a carrier-side problem, not a device problem. Contact your eSIM provider’s support team with your order confirmation and IMEI ready.
Best practices to control costs and data usage
Activation is only half the job. Once your plan is live, a few settings changes protect you from unexpected charges and keep your data lasting longer.
The two features most travelers forget to disable are Wi-Fi Assist on iPhone and Adaptive Connectivity on Android. Both switch automatically to cellular data when Wi-Fi is weak, which can rack up roaming fees without any deliberate action from you.
Also, manually selecting your partner network rather than letting your phone choose automatically prevents your device from latching onto expensive out-of-network carriers. In Settings > Carrier, disable automatic selection and choose a known partner like Vodafone or Orange.
Additional practices worth building into your travel data management routine:
- Download offline maps (Google Maps or Maps.me) before departure.
- Turn off background app refresh for non-essential apps.
- Disable iMessage and FaceTime to prevent unexpected data handoffs over cellular.
- Monitor data usage weekly through your carrier app or under Settings > Cellular > Current Period.
- Set data usage warnings or hard limits if your phone supports it.
My honest take on international data activation
I’ve activated mobile data plans in over 40 countries, and the step I see people miss most consistently is enabling data roaming after installing an eSIM. They install the profile, see it listed in their settings, assume it’s working, and wonder why they have no signal in the arrivals hall. The data roaming toggle is buried one level deeper than most people look.
The second thing I’ve learned: activate everything at home, on your own Wi-Fi, the night before you travel. Not at the gate. Not in the taxi from the airport. At home. You have time to troubleshoot, your connection is stable, and most eSIM plan timers don’t start until you actually connect abroad. That three-minute window you think you’ll have at the departure lounge? It evaporates when your flight boards early.
Manual network selection is genuinely underused. I’ve been in countries where automatic selection chose a network costing three times more than the partner network sitting right next to it in the list. Thirty seconds of manual selection has saved me real money on extended trips.
Read your plan’s expiration policy before you activate it. Some plans expire within 30 days of purchase regardless of when you travel. Others start the countdown from first use. Knowing this before you activate means you won’t waste days of a paid plan sitting in your inbox.
— Bogdan
Get connected before your next departure with Lumo
If you’d rather not manage the activation checklist from scratch every time you travel, Lumo makes the entire process straightforward from day one.

Lumo offers instant global data plans covering more than 160 countries, with eSIM profiles you can activate in minutes using a QR code scan directly in your phone’s cellular settings. No physical SIM swaps, no carrier calls, no surprise roaming bills. Plans are flexible, coverage extends across 5G and 4G networks worldwide, and support is available around the clock when you need it. Whether you’re heading out for a weekend conference or a month-long international assignment, Lumo has a plan sized for the trip. Browse available plans at Lumo and arrive connected.
FAQ
What is the first step in the data activation process?
Confirm your phone is carrier-unlocked and supports the plan type you’re purchasing before attempting any activation. A locked device will block third-party eSIM profiles entirely.
Why isn’t my eSIM connecting after installation?
The most common reason is that data roaming was not enabled after the eSIM profile was installed. Go to Settings > Cellular, select your eSIM line, and toggle data roaming on.
Can I activate my eSIM before I travel?
Yes, and you should. Most eSIM providers only start the plan timer when you first connect to a network abroad, so activating your eSIM at home on stable Wi-Fi is both safe and strongly recommended.
Why do I need to use cellular settings to scan my QR code?
Scanning from the camera app frequently fails and can invalidate a single-use QR code permanently. Always scan from within the eSIM or cellular settings menu on your device.
How do I stop my phone from using roaming data accidentally?
Disable Wi-Fi Assist on iPhone and Adaptive Connectivity on Android. Both features automatically switch to cellular data when Wi-Fi is weak, which can generate roaming charges without you realizing it.
Recommended
Related Topics
Stay Connected Anywhere
Get instant eSIM data plans for 160+ countries. No physical SIM required.