Dual SIM Travel Setup: Keep Your Number, Skip Roaming Bills

Set your travel eSIM as the device’s cellular data line and turn off data roaming on your home SIM, then keep your home SIM as the default voice line. This single change keeps you reachable on your normal number while every megabyte routes through your travel plan. Label both lines clearly and test calls, texts, and data before you leave home.
TL;DR:
- Check your phone model for eSIM support, destination bands, and unlock status a week before departure because carrier requests can take days.
- On most phones, Dual SIM Dual Standby keeps both lines reachable but permits only one active call or data session at a time.
- Keep data switching off for strict separation; enabling it may let the home line use roaming data during calls, and carrier support varies.
- Disable roaming on your home line, restrict background refresh and backups, and review voicemail forwarding, which can trigger international charges despite correct data settings.
- Before departure, test a call and text on your home line, then load a webpage using cellular data with Wi Fi turned off.
Table of Contents
- How dual SIM handles your calls, texts, and data
- Check your phone’s bands and unlock status before you fly
- Setting up dual SIM on an iPhone step by step
- Setting up dual SIM on Android: Samsung, Pixel, and others
- The exact settings that stop surprise roaming charges
- Test everything before you leave, and quick fixes if something’s off
- Why a prepaid travel eSIM simplifies this whole process
- What I’d actually tell a friend before their trip
- Get your travel eSIM set up before you pack
- FAQ
- Sources
How dual SIM handles your calls, texts, and data
Most phones that support two SIMs use Dual SIM Dual Standby, meaning both lines stay connected to a network, but only one can carry an active voice call or data session at a time. The other line still receives texts and can accept an incoming call, which is why your home number stays reachable even while your travel eSIM handles data. A smaller number of devices support Dual SIM Dual Active, letting both lines carry data or calls at once, though this is less common in consumer phones.
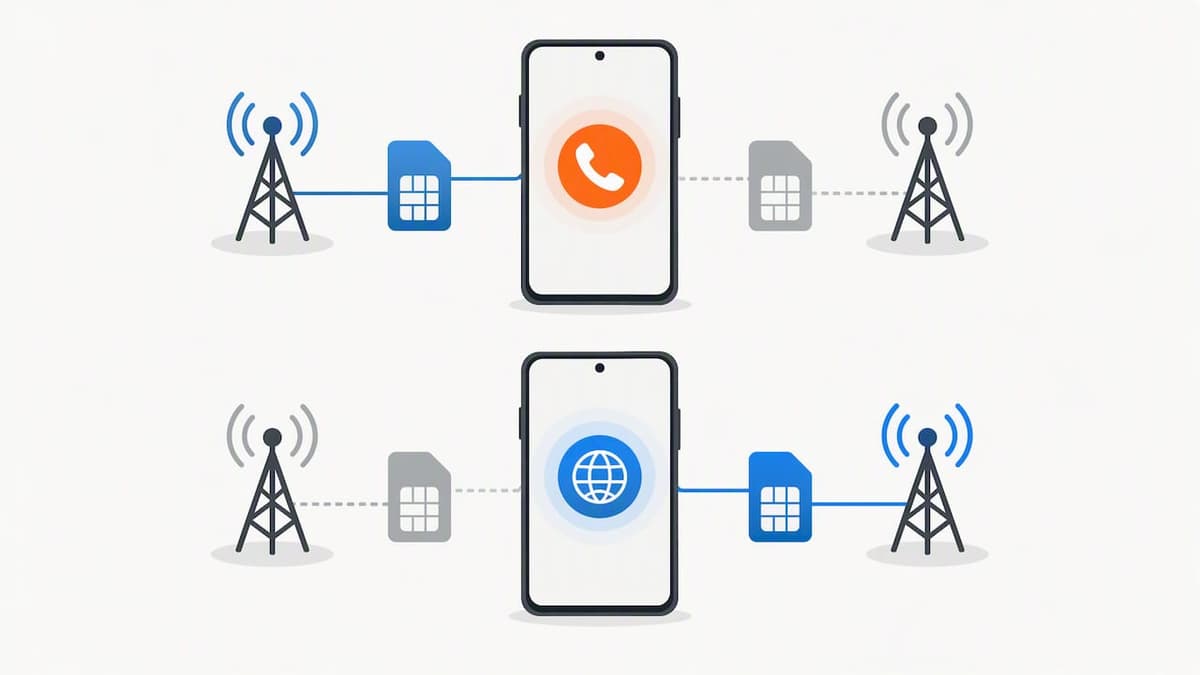
The difference between a physical SIM and an eSIM is where the plan lives, not how it behaves. A physical SIM is a removable card, while an eSIM is a software profile installed directly on the device. Many current phones can store multiple eSIM profiles even though only one or two can be active at a time, which is why travelers often keep a home eSIM or physical SIM installed alongside a new travel eSIM instead of swapping cards.
Two settings decide how your phone behaves once both lines are active:
- Cellular data line: this tells the phone which SIM handles internet traffic by default, and it should point to your travel eSIM while abroad.
- Data switching: a toggle (called Allow Cellular Data Switching on iPhone and “Data during calls” on Pixel and other Android phones) that lets your voice-only line briefly borrow data from the other line during a call.
That data-switching toggle exists because a voice call on one line can block data entirely on phones that only support one active connection at a time. Turning it on means your home line could use data without you noticing unless its data roaming is off, so it is worth understanding before you decide whether to leave it enabled while traveling.
Check your phone’s bands and unlock status before you fly
A travel eSIM only works if your phone can physically talk to the local network, so compatibility checks come before activation, not after. Phone makers publish the specific frequency bands and eSIM support for each model, and that list is the first thing to check against your destination.
- Find your model’s specs: search your phone’s model number on the manufacturer’s support site to confirm eSIM support and the full band list.
- Match bands to your destination: carriers in different countries often use different frequency bands for 4G and 5G, and a phone missing the right bands will fail to connect even with an active local plan, a point CTIA’s roaming guidance makes clear for travelers checking compatibility ahead of a trip.
- Confirm your phone is unlocked: a locked phone may refuse any SIM, physical or digital, that is not from its home carrier.
Unlocking is usually a request to your home carrier, who may require the device to be paid off or active on their network for a set period before approving it. Once unlocked, most phones accept any compatible eSIM or physical SIM without further carrier involvement. Our guide to mobile network compatibility walks through checking bands and unlock status by destination before you commit to a plan.
Pro Tip: Check your unlock status and band list at least a week before departure, since carrier unlock requests sometimes take a few days to process.
Setting up dual SIM on an iPhone step by step
Apple’s own guidance on using Dual SIM with an eSIM covers the core steps, and the order below follows that same logic for a traveler adding a new plan.
- Add the travel eSIM. Go to Settings, then Cellular, then Add Cellular Plan, and scan the QR code from your travel eSIM provider, or follow the carrier’s app-based activation if offered.
- Label both plans. Rename them something obvious, such as “Home” and “Travel,” so you never confuse the two in settings or when choosing a line for a call.
- Set Cellular Data to the travel eSIM. In Cellular settings, tap Cellular Data and select the travel plan as the default for data.
- Turn off Data Roaming on the home line. Tap into your home plan’s settings and switch Data Roaming off, which stops it from connecting to foreign networks even accidentally.
- Decide on Allow Cellular Data Switching. Leave it off if you want full separation between lines, or turn it on if you want your home line to grab data during a call as a backup, understanding it depends on carrier support according to Apple’s documentation.
- Set your default line for iMessage and FaceTime under Settings > Messages and Settings > FaceTime, choosing whichever number your contacts expect to reach.
- Test before you fly. Send a text, place a short call, and load a webpage on the travel data line while still on home Wi-Fi and cellular, confirming both lines behave as expected.
On supported iPhone models, you can keep two eSIMs active at once, according to Apple’s travel eSIM guidance, which means your home eSIM and travel eSIM can both stay installed and switch roles without physically removing anything.
A handful of newer iPhone models also support two active eSIMs with no physical SIM tray at all, which simplifies this entire process since there is no card to misplace or swap at the airport.
Setting up dual SIM on Android: Samsung, Pixel, and others
Android’s dual SIM settings sit in slightly different menus depending on the manufacturer, but the underlying logic matches iPhone: add the plan, set a data default, and manage data switching.
- Add the travel eSIM. On most Android phones, go to Settings > Connections (or Network & Internet) > SIM Manager, then choose Add Mobile Plan and scan the travel eSIM’s QR code.
- Label the lines. Rename each SIM in the SIM Manager so “Home” and “Travel” are unmistakable in every menu.
- Set preferred SIMs separately for calls, texts, and mobile data. Android lets you assign each function to a different line, so set mobile data to the travel eSIM while leaving calls and SMS on your home line.
- Turn off data roaming on the home SIM. This sits under the home SIM’s individual settings, usually labeled Data Roaming or Mobile Data Roaming.
- Check Data During Calls. On Pixel phones, this setting lets your non-data line access data mid-call, similar to Apple’s data switching feature, and it depends on carrier support just like its iPhone counterpart.
- Review manufacturer-specific SIM manager options. Samsung’s Galaxy devices include a SIM Card Manager with the option to convert a physical SIM to an eSIM on supported models, which is worth checking if you are consolidating lines before a trip.
- Test both lines before departure. Confirm the travel eSIM loads data, the home line can still send and receive texts, and calls connect on whichever line you designated.
Our step-by-step eSIM activation guide covers the QR scanning process in more detail if you want screenshots alongside these steps.
The exact settings that stop surprise roaming charges
Getting the setup right once is not enough if background processes quietly undo it. A short list of settings and habits closes most of the gaps that lead to surprise charges.
- Confirm Data Roaming is off on your home line and that your travel eSIM is set as the active cellular data line, since this single pairing prevents the vast majority of accidental charges according to the FCC’s international roaming guidance.
- Restrict background app refresh and automatic updates on apps tied to your home line, since app stores and cloud backups can trigger large data transfers without any visible prompt.
- Review voicemail and call forwarding settings, since some carriers route voicemail access or forwarded calls through international rates even when your data line is correctly set.
- Turn on Wi-Fi calling where your carrier supports it, which lets you make and receive home-line calls over Wi-Fi instead of the cellular network entirely.
- Check usage from your device settings or carrier app a day or two into your trip to confirm data is flowing through the travel line and not the home line.
Carriers may not post international charges until a later billing cycle, which is exactly why the FCC warns travelers to confirm settings before departure rather than checking a bill afterward. Many travelers assume that simply inserting or activating a travel SIM is protection enough, but background processes can still reach for the home line unless data roaming is explicitly disabled on it.
Pro Tip: Set a low data usage alert on your home line through your carrier’s app before you leave, so any unexpected activity gets flagged immediately instead of surfacing on your next bill.
Our guide to avoiding roaming fees walks through these same settings with screenshots for both iOS and Android if you want a visual reference while you configure your phone.
Test everything before you leave, and quick fixes if something’s off
A few minutes of testing at home catches problems you don’t want to troubleshoot at a foreign airport with spotty Wi-Fi.
- Activate both eSIMs or SIMs and confirm each shows as active in your phone’s cellular settings.
- Relabel both lines if the default names are confusing, using something as plain as “Home” and “Travel.”
- Confirm the cellular data line points to the travel plan, not the home line.
- Test a call and a text on the home line, and load a webpage on the travel line, ideally with home Wi-Fi off so you’re testing actual cellular behavior.
- Check voicemail access works the way you expect, since some forwarded voicemail setups behave differently once you’re on a foreign network.
If something doesn’t connect once you’ve landed, a short troubleshooting sequence resolves most issues:
- Toggle airplane mode on and off to force the phone to re-register with the local network.
- Manually reselect the network under cellular settings if automatic selection stalls.
- Remove and re-add the eSIM profile if it still won’t activate.
- Double check your unlock status, since a locked phone will silently fail to register on a foreign network.
- Contact your eSIM provider’s support for activation issues, and your phone manufacturer’s support for device-level problems like a missing eSIM menu option.
Our troubleshooting guide for eSIM connectivity covers these same steps with more detail on distinguishing a device problem from an activation problem.
Why a prepaid travel eSIM simplifies this whole process
A prepaid travel eSIM removes the parts of this setup that cause the most confusion: no physical card to source abroad, no store visit, and no new phone number to distribute to contacts since your home line stays untouched for calls. We built our plans around instant QR code activation, so the “add the travel eSIM” step in the setup walkthroughs above takes a couple of minutes rather than a trip to a kiosk.
We support more than 160 countries and let a single device hold multiple eSIM profiles, which matters if you’re visiting several countries on one trip and want a fresh local plan at each stop rather than one expensive regional bundle. Our coverage checker shows which networks we work with in a given country before you buy, which pairs directly with the band-compatibility check covered earlier in this guide. Setup support is available around the clock if activation doesn’t go as expected.
The workflow maps directly onto what this guide has already covered: scan the QR code, label the plan, set it as your cellular data default, and turn off roaming on your home line. Nothing about using a prepaid eSIM changes those steps. It just removes the friction of finding a local SIM card once you’ve landed.
What I’d actually tell a friend before their trip
The data-on-travel, voice-on-home split is the setup I’d recommend without hesitation, and the research backs it: it’s the configuration least likely to leave you with a surprise bill or an unreachable phone number. The one tradeoff worth knowing is that data switching features, Allow Cellular Data Switching on iPhone or Data During Calls on Android, sound convenient but quietly reopen the door to roaming charges if you turn them on without testing first. Voicemail is the other quiet troublemaker, since forwarded voicemail sometimes routes through international rates even when everything else is configured correctly.
Test before you fly, not after you land. And keep your carrier’s support number and your eSIM provider’s support contact saved somewhere that doesn’t depend on data working.
— Theo Wheeler
Get your travel eSIM set up before you pack
Everything in this guide assumes you have a travel eSIM ready to install, and getting one shouldn’t be the hard part of your trip. Prepaid plans with instant QR code activation, no contracts, and no registration delays are available, so you can complete the setup steps above the same day you buy.
- Multi-country trip: Global eSIM Plans start from $7 one-off and cover numerous destinations on one profile.
- Staying in one region: check Europe eSIM Plans from $1 one-off, Asia eSIM Plans from $2 one-off, or United States eSIM Plans from $2 one-off.
- Other regions: Africa eSIM Plans start from $8 one-off, Caribbean eSIM Plans start from $8 one-off, and United Kingdom eSIM Plans start from $1 one-off.
FAQ
How does dual SIM work on a Samsung phone?
Samsung Galaxy devices manage dual SIM through the SIM Card Manager in settings, where you can add an eSIM by scanning a QR code and assign separate preferred lines for calls, texts, and mobile data. Some Galaxy models also let you convert a physical SIM to an eSIM directly in that same menu, according to Samsung’s support documentation.
Can I use an international SIM on my iPhone while traveling?
Yes, most iPhone models released in recent years support adding an eSIM alongside your home line, and some support two active eSIMs at once, based on Apple’s own guidance. You’ll need to confirm your specific model supports eSIM and that it’s unlocked before a foreign eSIM will activate.
What are the drawbacks of a dual SIM setup?
The main tradeoff is that most phones use Dual SIM Dual Standby, meaning only one line can handle an active call or data session at a time, so you can’t use both simultaneously for data-heavy tasks. Data-switching features that let one line borrow data from the other depend on carrier support and can cause unexpected charges if left on without testing, per guidance from Apple and Google’s Pixel support.
Can both SIMs stay active on a phone at the same time?
Most phones use Dual SIM Dual Standby, where both lines stay connected to a network but only one can carry an active call or data session at once. A smaller set of devices support Dual SIM Dual Active, allowing both lines to handle calls or data simultaneously, though this remains uncommon in most consumer phones.
How much does a Lumo eSIM plan cost?
Pricing depends on the destination and plan size you choose: Europe and United Kingdom plans start from $1 one-off, United States and Asia plans start from $2 one-off, and Global, Africa, and Caribbean plans start from $8 one-off or less. Full pricing and data options for each region are listed on our destination pages.
Sources
- International Roaming: Mobile Phone Use Abroad | Federal Communications Commission
- Using Dual SIM with an eSIM - Apple Support
- Pixel phone support: Data during calls / dual SIM behaviors
- How roaming works | CTIA
Recommended
Related Topics
Stay Connected Anywhere
Prepaid eSIM data plans for 180+ countries and territories. No physical SIM required.